How to Set a Photo Library as the Screen Saver on your MAC

Learn How to Set a Photo Library as the Screensaver on your MAC: Set up a photo library as a screensaver in your Mac without using any third party tool, by just following simple guide and making any library as a screensaver. So have a look on complete guide discussed below for setting a Photo Library as the Screen Saver.
creen savers, We all are familiar about this word. Almost, every Android user might have used this feature. But how to set a video as a screensaver in Mac, this is our main concern here. Mac provides a number of options when we talk about screen savers. To use video as a screensaver, there is no other really beautiful option as a screensaver. If you want something new as a personal such as vacation albums as a screensaver, you have a way to do that too. The Mac’s built-in-system panel allows you to set a photo library as the screensaver. You must gather all your favorite photos in a photo library and select and use it as a screensaver.
How to Set a Photo Library as the Screen Saver on your MAC
The method is quite simple and easy and you will not need of any third party tool and just simple steps that will allow you to set a photo library to the Screen saver in your Mac. So follow the below steps to proceed.
Steps To Set a Photo Library as the Screen Saver on your MAC:
Step 1. In the top-left corner, Click on the Apple logo and select “System Preferences..” that is to be taken to system panel.

Step 2. When the system panel appears, click on the “Desktop & Screensaver“.
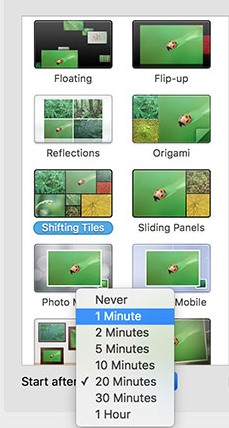
Step 3. On the following screen, Click on the “Screen Saver” tab . Select any screensaver from the left panel which shows the motion of the photos such as Shifting Tiles.
Once you have selected your screensaver, Next to “Source” click on the drop down menu and select “Photo Library“. This is the way that lets you source images from a photo library as a screensaver.
Once you have selected your screensaver, Next to “Source” click on the drop down menu and select “Photo Library“. This is the way that lets you source images from a photo library as a screensaver.

Step 4. You must be able to choose a photo library that can be used as the screen saver. Select the required option and click on “Choose“.
Step 5. To customize your favorite screen saver, select the “Shuffle Slide Order” checkbox and randomly, it will show you the images from the chosen library.

Step 6. if you wish to appear your screen saver in a certain amount of time , select the appropriate option from the “Start after:” drop down menu. Its up to your choice what time you select as short as one minute and as long as one hour for the start after time.
Step 7. If your all settings are complete then you can preview the screensaver by hovering over the thumbnail and select “Preview“.
Step 8. That’s it you are done, now the selected photo library will get set in your Mac screen saver.
So above is all about How to Set a Photo Library as the Screensaver on Your Mac. With this you can easily set your favorite photo album right on your desktop screen. Hope you like the tutorial, keep on sharing. Leave a comment if you have any related query.


Post a Comment