How to Enable Full Disk Encryption in Windows 10
Your data can be easily hijacked by knowing some simple tricks or having single access to your PC. Therefore, its time to protect your disk drives from unauthorized access by encrypting full disk in Windows 10.
n your PC there is lots of personal data that can be accessed by any unauthorized person. This is just because your windows data is openly saved in your drives or say disks that are not encrypted or protected by encryption method, so even normal person can also hijack your data very easily by knowing some simple tricks or having single access to your PC and I am sure that not any of you want to compromise your privacy that is with your private data that you stored in your Windows PC. So to overcome this we are here with a method by which you can encrypt or say protect your data from being accessed by any unauthorized person. And that can be done by disk encryption in windows 10. Follow up the complete guide discussed below to proceed.
Also Read: How To Update Windows 10 Offline
How to Enable Full Disk Encryption in Windows 10
The disk encryption is the inbuilt feature in windows OS and in its latest version that is Windows 10 you can use this cool feature to secure the disk by completely encrypting it. So follow up the below steps to proceed.
Steps To Perform Complete Disk Encryption in Windows 10:
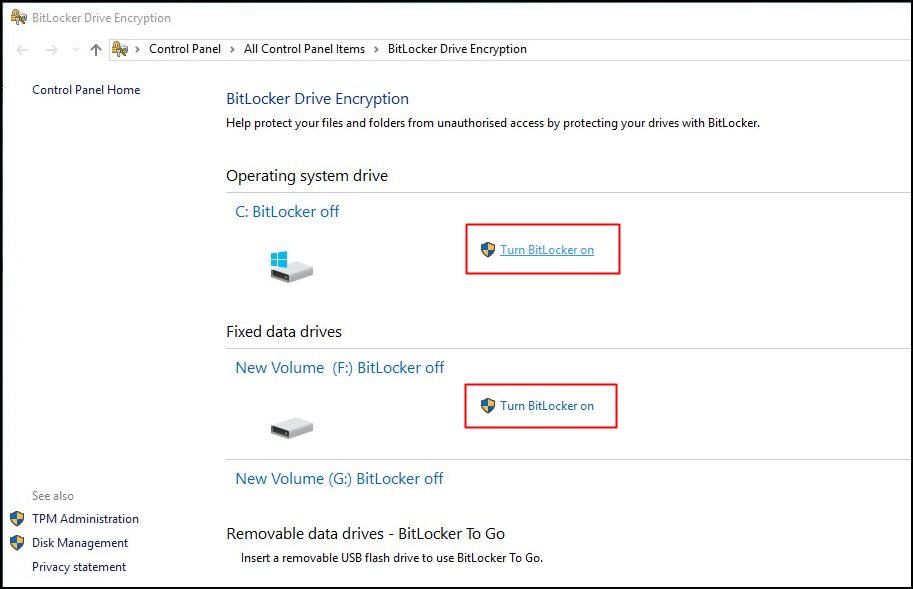
Step 1. First of all, go to start or press windows button and then type “BitLocker” and press enter.

Step 2. Now you will be inside Manage Bitlocker option there, and you will now get the encryption options there.

Step 3. Firstly starting from C drive where windows are being installed and all your user data is saved, you can encrypt that drive by clicking on Turn on BitLocker. You can also select any other drive to encrypt first as per your wish.

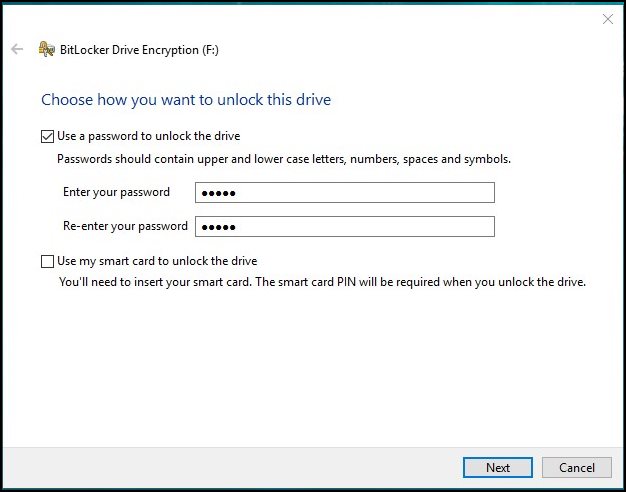
Step 4. Now you have to select the method to encrypt the drive that is either using the password or using the smart card. We recommend going for password encryption. Enter any of password and again confirm it.

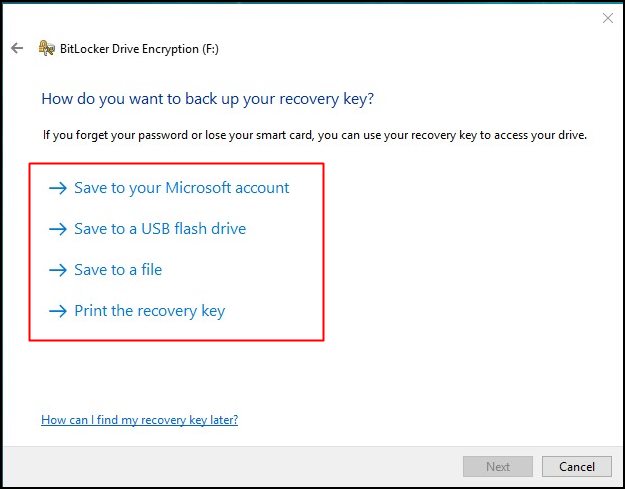
Step 5. Now choose any of the ways where you want to save the password you entered. And then the complete drive encryption at next step.

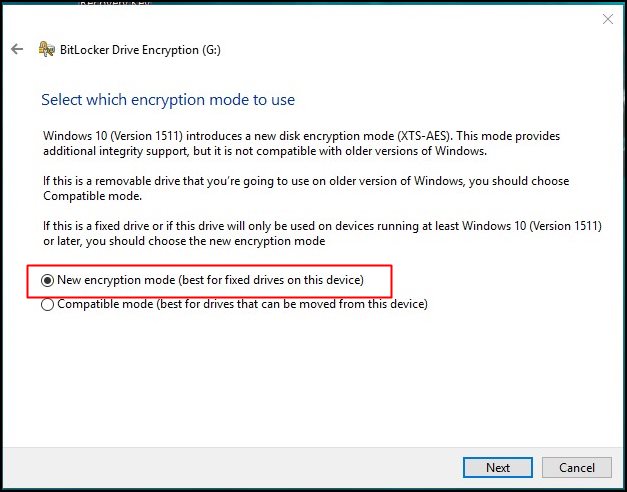
Step 6. Now in the very next step, you need to select “New Encryption mode” and then click Next. Now encryption process will start and it will take up to hours and after that process will complete after some time.

That’s it your device will be now get encrypted with the password that you have set and also you can repeat the same thing with all other drive and that can too get encrypted and your data will get secured from any illegal access.
So above is all about How to Enable Full Disk Encryption in Windows 10. With this, you can easily secure your private data that you stored in the disk drives of your windows by encrypting them with bit locker. Hope you like this, do share with others too, Leave a comment below if you have any related queries with this.


![4K Video Downloader 4.0.0.2016 Cracked Full Version [Latest]](https://blogger.googleusercontent.com/img/b/R29vZ2xl/AVvXsEibkBM9H3EnNYaE5zSqVnCgYSR787ZLlDLasK39cQvwhoKnFWQGupuLghGG5yNirr_-t0_pBJeDrjfscYQipi2PRoqgjN0mlmrdAmSBnFMOEp6e4mHxYyYRZ9aGALUdSLx6IpuzmvUw58o/s72-c/4k-Video-Downloader-2015.jpg)


Post a Comment