How To Set different languages For Each of your Android Apps
Learn how to set different languages For Each of Your Android App that you have installed on your Android phone to get the easy understanding of the working of the different apps in your mobile.
ndroid system is made in such a way that there is only one single particular language that applies to the whole of the apps and the system according to the one that is pre selected. And for making up the different apps run with different languages there has been no such control provided in the Android OS. This becomes a great issue in case of social media apps or news apps that are mostly coded throughout in the developer’s native tongue language and the translation to other languages although may be present but is always poorly translated. So if you are the one who is also struggling to find up the right language translation for your apps and are going through the language barrier while working with the Android then there is a method by which you can set up different languages for each of your Android App and that method is described below in this article.
How To Set different languages For Each of Your Android Apps
This process will require to root your Android device and some other root apps like Xposed Framework installed and if you have not still done all that, first prefer to do root your device and install the necessary root apps.
Steps To Set different languages For Each of Android Apps:
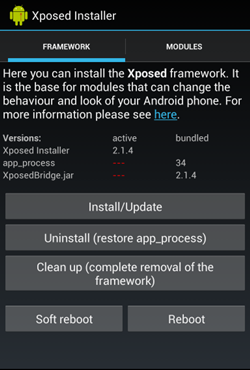
1. First of all, you need to root your Android device because the app that we are going to discuss right here only works on rooted Android and for that see our tutorial on Root Any Android. Now after you rooted your device, download and install the app Xposed Installer.After installing this app, you have to reboot your android to make this app work correctly on your Android.

2. The very first thing that you will have to do is to install up the app named “App Locale” that is searched from within the modules tab of the Xposed Framework app i.e the root app. Now you will have to activate that installed Module or App Locale from the options that appears when you check for the installed modules tab in the Xposed app.
3. After activating the app you will require to restart your device so as to make that module running on your device.
4. After restarting your device, you can find up the app installed on your device and you can find it under the apps list of your device. Open up the app from it’s icon from the dock of your Android home screen.

5. You can now see up the app interface in which there are all your apps stated in the form of list.
6. Choose up any of the app for which you want to change up the language and then using the app interface, select the desired language from the options and tap on the confirm button. You will now have to close the App Locale and open up the App whose language you had set up.

7. You will be able to see up the changes of the language inside your App and all the menu texts to any basic text inside the app can be viewed in your selected language.
Also Read: How to Capture Moving photos in Android
So, this is the method in which you can easily change up the language of your desired Android app on your device just by using up one single app called App Locale. Using this app won’t hurt any other process of your device and need not to be running all time in the background but will only become active when the particular app will be launched for which the language is set to be changed.


![4K Video Downloader 4.0.0.2016 Cracked Full Version [Latest]](https://blogger.googleusercontent.com/img/b/R29vZ2xl/AVvXsEibkBM9H3EnNYaE5zSqVnCgYSR787ZLlDLasK39cQvwhoKnFWQGupuLghGG5yNirr_-t0_pBJeDrjfscYQipi2PRoqgjN0mlmrdAmSBnFMOEp6e4mHxYyYRZ9aGALUdSLx6IpuzmvUw58o/s72-c/4k-Video-Downloader-2015.jpg)

Post a Comment